🗄️ My Home server setup in 2024
Oh, it’s been a while since I posted anything to my blog 😅 While I’ve been regularly updating the site with my travel adventures, today I’m excited to share the latest developments in my home server setup. A lot has evolved since my last post about my Raspberry Pi configuration!
The hardware shift
First of all, my Raspberry Pi began showing signs of instability, with frequent crashes of the Home Assistant OS every few weeks. Despite multiple attempts at troubleshooting, including OS reinstallation and config changes, the issue persisted. A colleague suggested it might be a power supply issue, but I never got around to verifying this.
Second - I wanted to run more software on the server and doubted the Pi’s capacity for this.
Last, but not least - I was just bored and really wanted to play with some new stuff 😂
After some research, I discovered that many people are opting for old Intel NUC computers for their home servers. They’re affordable, compact, and powerful.
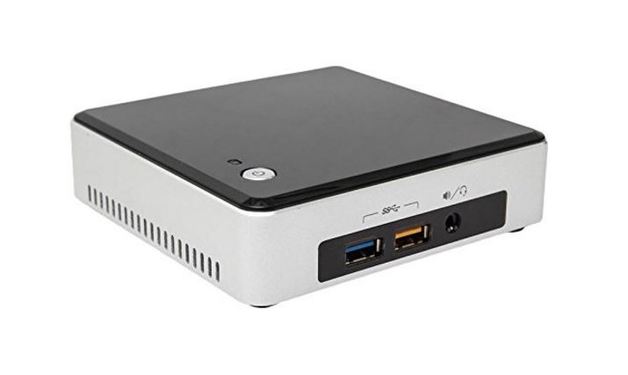
I bought a 2015 Intel NUC from Leboncoin for about 100EUR. It’s equipped with a Core i5 (2 cores, 4 threads), 8GB of RAM, USB3 ports, and a 120GB SSD. Compared to Raspberry Pi, it consumes more energy, but I did some maths, and running NUC in my case will cost only an additional 2EUR per month. I’m OK with that 😁
The Software Ecosystem
To manage multiple software instances seamlessly, I installed Proxmox. It’s a user-friendly platform for managing VMs and LXC containers. My current setup includes:
- VM for HomeAssistant OS
- VM for OpenMediaVault
- LXC container for Blocky
Diving Deeper into My Setup
HomeAssistant
Home Assistant remains the core of my smart home. There’re multiple ways of installation and I’ve decided to go forward with the Homeassistant OS. The main reason is ease of use. If I need to install something, I just go to the addon store and install it. If I need to update something, I just click the button in the UI and that’s it. In the past, I used to run homeassistant as a docker container, but I found homeassistant OS more convenient to use.
Zigbee devices
I’ve integrated various Zigbee devices from different manufacturers into a single hub in HomeAssistant. This is made possible with the SONOFF Zigbee 3.0 USB Dongle Plus-P and the installation of Zigbee2MQTT + Mosquitto broker add-ons.
 Try to find a dongle
There’s a built-in alternative called ZHA, but I haven’t experimented with it yet. Zigbee2MQTT has been my go-to since my first HomeAssistant installation.
Smart lighting
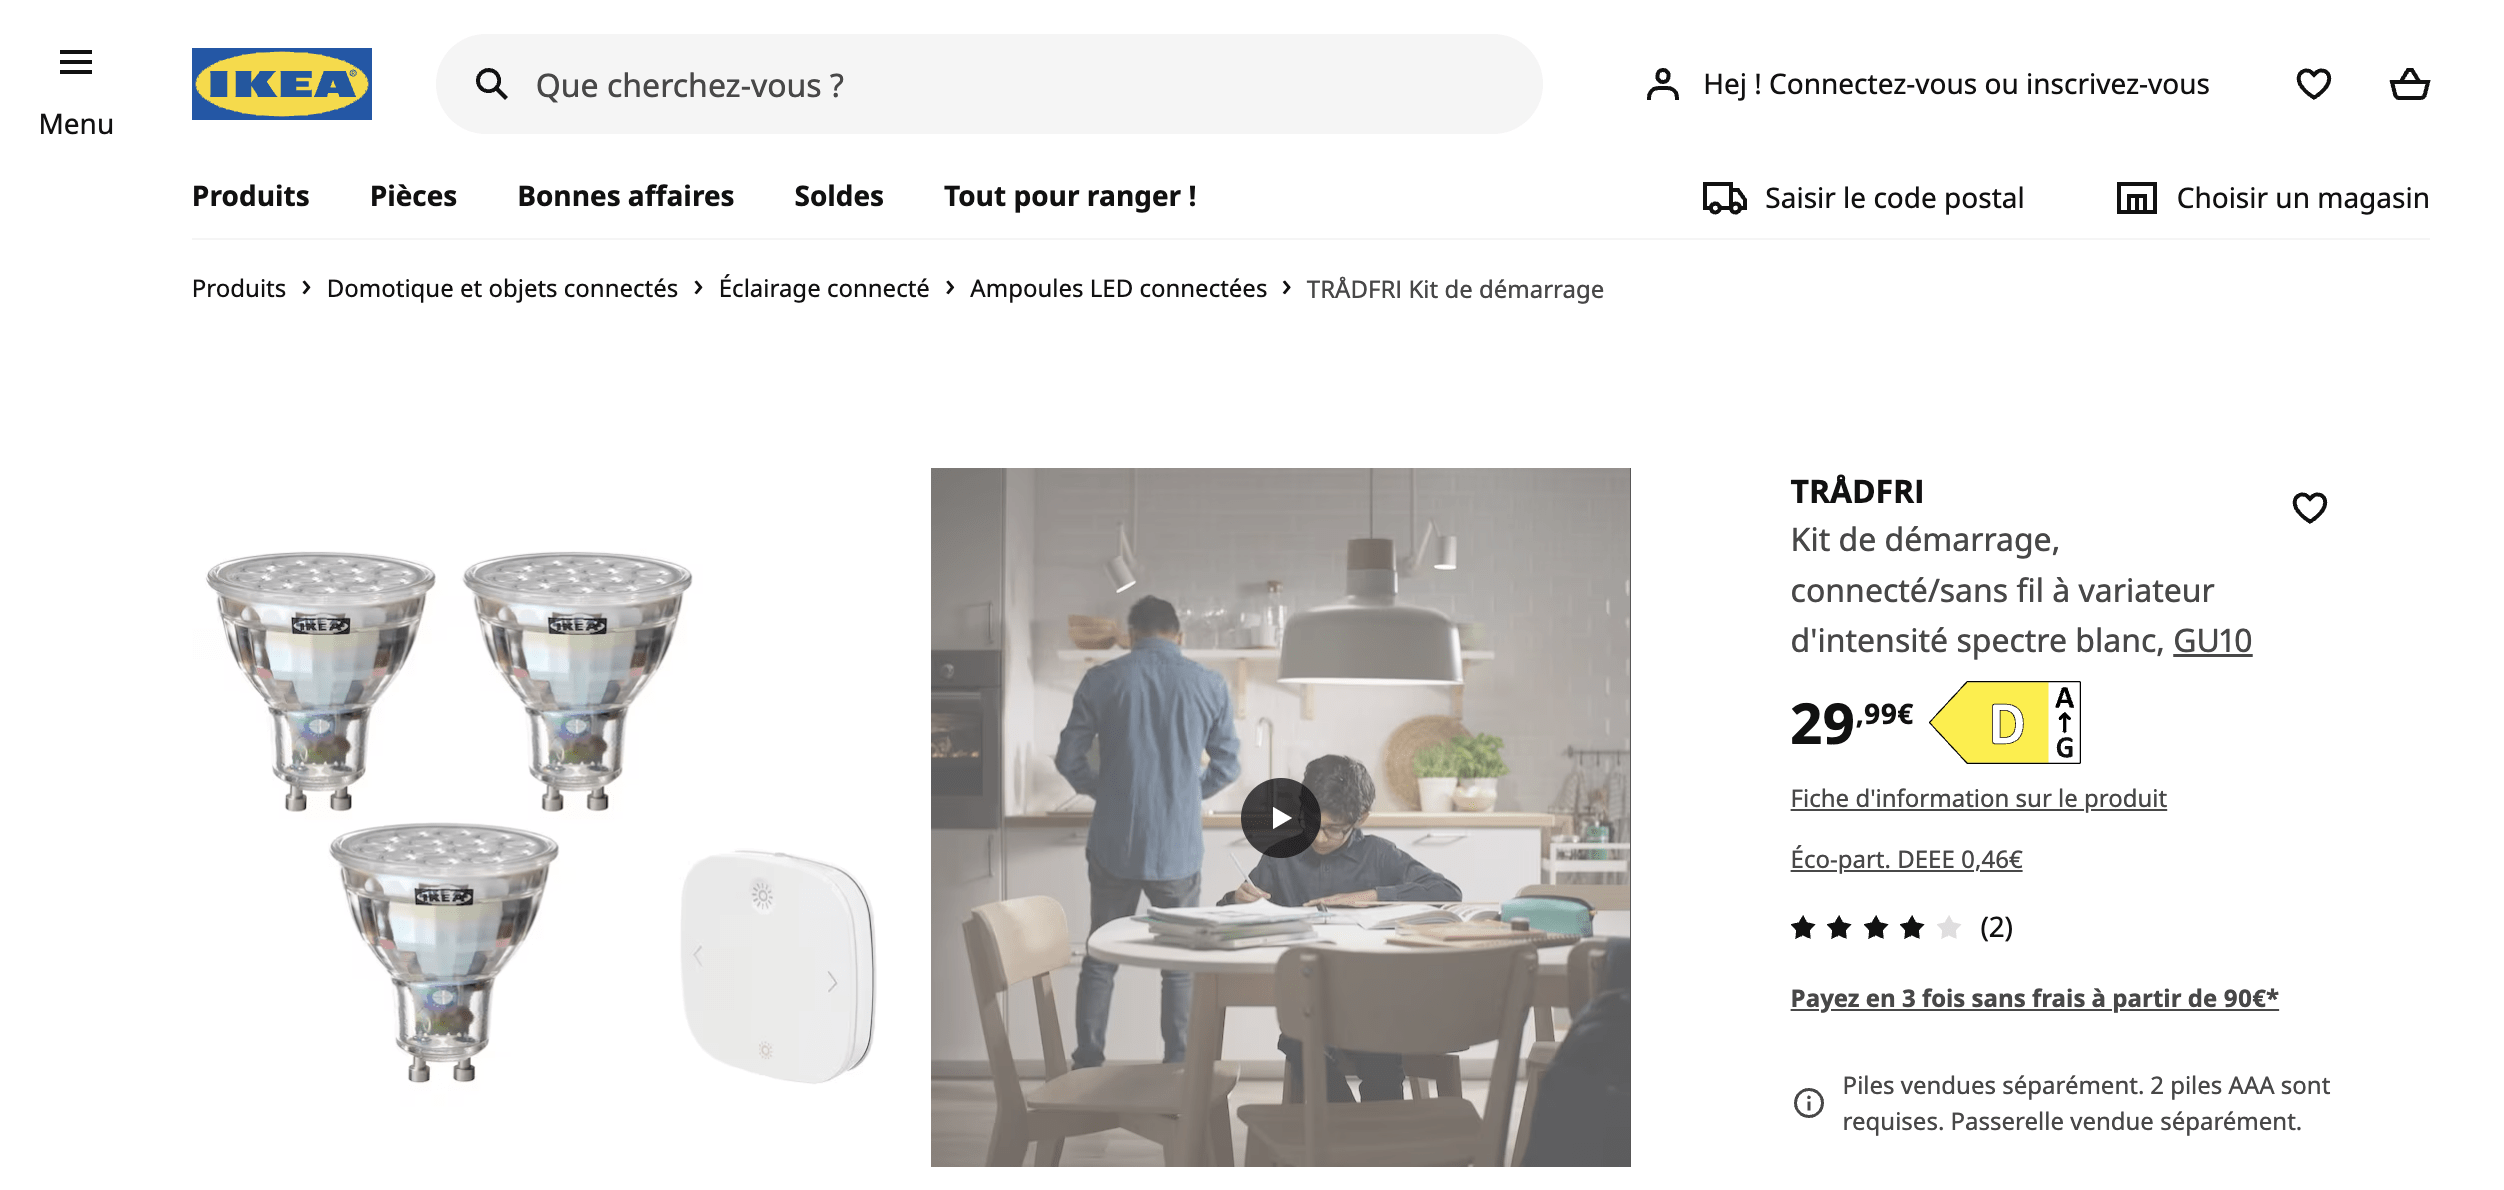
IKEA’s budget-friendly light bulbs were a game-changer for me. For a long time, I thought one smart bulb cost at least 25EUR, and replacing lighting in my apartment would be too expensive, as I needed 9 of them. However, it turns out that IKEA sells really great smart bulbs for only 9.99EUR with temperature and intensity control.
I grouped these bulbs into two zones - kitchen (3 bulbs) and bedroom (6 bulbs), using Zigbee groups. From my understanding, you should use Zigbee group as much as possible, because from a low-level perspective, it allows you to send just 1 message to control all devices in a group, while homeassistant groups will send 1 message per device.
These bulbs came with a remote, and it was a bit challenging to configure it. Technically, you can pair the remote with light bulbs directly, but it turned out it had a limitation of 3 bulbs (or even 2, I don’t remember exactly). In my case, it was unacceptable because I wanted to control 6 bulbs at the same time. To solve this, I installed a ControllerX addon which allowed me to control a light group consisting of as many devices as I wanted. The downside is a dependency on Home Assistant; if it crashes, the remote won’t function. But given the stability of my setup, I’m comfortable with this trade-off. In the worst case, I can always use my old-school regular light switch.
I also had a smart LED strip from Aliexpress that I put under the bed, but my dog destroyed it 😅
Smart heating
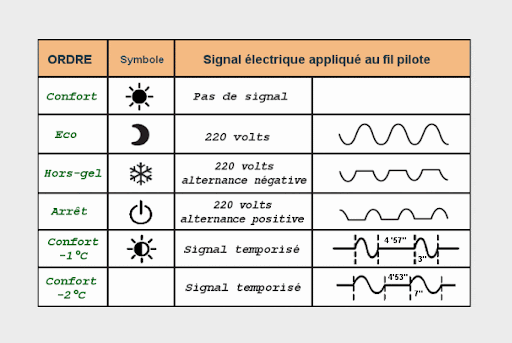
In France, many electric heaters are equipped with a “Fil pilote” wire, allowing for remote control of heating modes.
To leverage this feature, I purchased Heatzy Pilote One devices. Initially, I tried controlling them with the Heatzy iOS app but faced issues with inaccurate temperature settings and a buggy interface. Luckily, a community-maintained Home Assistant add-on offered a more reliable and actually smarter solution.
I set up a “generic thermostat” in Home Assistant to automate heater control based on a remote temperature sensor’s readings. I placed the temperature sensor away from the heaters and set up a thermostat with the following code:
climate:
    - platform: generic_thermostat
      name: Thermostat Bedroom
      heater: switch.heatzy_main_room
      target_sensor: sensor.room_temperature_sensor_temperature
      target_temp: 20
      min_cycle_duration:
        seconds: 60
      initial_hvac_mode: "off"
      precision: 0.1

switch:
    - platform: template
      switches:
        heatzy_bedroom:
          value_template: "{{ is_state_attr('climate.bedroom', 'preset_mode', 'comfort') }}"
          turn_on:
            service: climate.set_preset_mode
            data:
              entity_id: climate.bedroom
              preset_mode: 'comfort'
          turn_off:
            service: climate.set_preset_mode
            data:
              entity_id: climate.bedroom
              preset_mode: 'away'
        heatzy_kitchen:
          value_template: "{{ is_state_attr('climate.kitchen', 'preset_mode', 'comfort') }}"
          turn_on:
            service: climate.set_preset_mode
            data:
              entity_id: climate.kitchen
              preset_mode: 'comfort'
          turn_off:
            service: climate.set_preset_mode
            data:
              entity_id: climate.kitchen
              preset_mode: 'away'
    - platform: group
      name: Heatzy Main Room
      entities:
        - switch.heatzy_kitchen
        - switch.heatzy_bedroom
This setup has been highly effective, look at this screenshot:
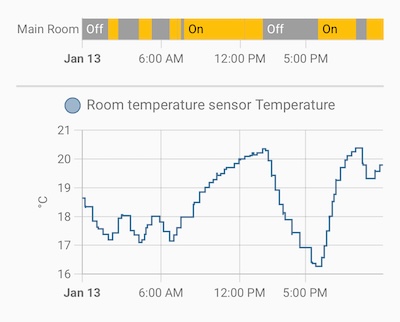
Here you can see that every time temperature goes below a certain degree, the heaters are turning on, and turning off when they reach a certain temperature. I also added automations to change the reference temperature at 23:00, at 7:00, turn off the heating when everyone leaves the home, and turn it on when someone arrives at the home
HomeKit integration
Being an Apple user, I’ve integrated a HomeKit bridge in HomeAssistant. This lets me control my lights and thermostat through Apple devices and automations. One of the standout features of this setup is its precise location-based automation. These automations work accurately without the installation of any additional applications, making it incredibly user-friendly.
Moreover, this integration has significantly simplified the experience for my girlfriend, as everything works automatically for her without requiring any technical knowledge or additional setup on her part.
Additionally, the presence of a HomePod in my home added another layer of convenience, allowing me to control my smart devices through voice commands.
Openmediavault
OpenMediaVault is my choice for running an SMB server. It serves multiple purposes:
- Time Machine backups for my MacBook.
- Backups for my server’s VMs and LXCs.
- Network storage to free up space on my devices.
I’m using a 2TB external hard drive connected via USB3, organized into a ZFS storage pool with enabled compression. I allocated 1.5TB for the Time Machine and 500GB for network storage. In the future, I plan to expand the setup by adding another drive and enabling mirroring, which should be straightforward with ZFS.
Setting up OpenMediaVault was a bit of a challenge. Initially, I tried installing it in an LXC container, but it didn’t play well with ZFS. After several hours of attempts, I switched to a VM installation, and it worked seamlessly.
Blocky
It is a lightweight adblocking DNS server. In the past, I used Adguard Home which worked pretty well, but I’ve decided to try out something new. It performs well and is resource-efficient, using less than 1% of CPU and about 120MB of RAM.
To ensure reliability, I’ve taken extra precautions. For instance, I’ve prioritized Blocky’s CPU requests in the event of high demand from other VMs via the “CPU units” feature in Proxmox. I guess ideally it should be running on a separate server with nothing else, but my current setup is pretty stable and I’ll keep it for the time being.
Conclusion
That’s a brief overview of my home server setup in 2024. It’s been a fun and educational journey setting it all up, and I’m quite satisfied with how it’s performing. I hope this gives you some insights and ideas for your own smart home projects!